Creating your first iOS App
We are going to create a basic iOS 7 application which will give us the basics that every iOS developer needs to know.
In our app the first page will have 2 buttons “ Fire” and “Water”. On click of “fire” button it will take us to another page that will contain a button “Fire Message” that will give us an alert message on click of that button. Coming back to our home page, if we click on “Water” button it will take us to another page that contains a text field, button and an image displayed. When the user enters his/her name in the text filed and clicks on the “Water message” button, an alert message will be displayed which will contain his/her name in the alert.
Let’s get started!

We need to first create a new project. Click on the Xcode icon.The welcome window will appear, Click “Create a new Xcode project” (or choose File > New > Project).
Once we create a project, Xcode opens a new window and displays a dialog in which you can choose a template.
Xcode includes several built-in app templates that you can use to develop common styles of iOS apps, such as games, apps with tab-based navigation, and table-view-based apps. Most of these templates have pre – configured interface and source code files for you to start working with.
- In the iOS section at the left of the dialog, select Application.
- In the main area of the dialog, click Single View Application and then click Next.

In the dialog that appears next, name your app and choose additional options for your project and click Next.
Let’s take a look at the various options.
- Product Name: The product name will be the name of your application.
- Organization Name: The organization name can be your own name or the name of your company. Xcode uses the organization name for various purposes, such as adding a copyright notice to each source file.
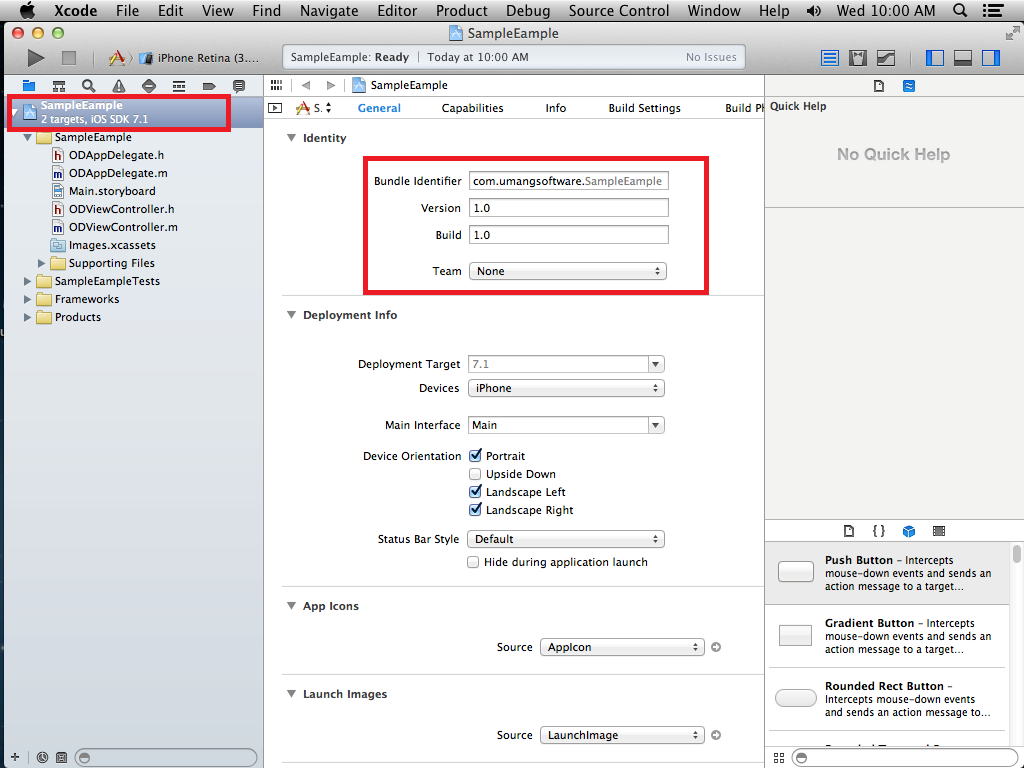
- Company Identifier: The company identifier is a unique string, which Xcode uses (together with the product name) to create the application’s bundle identifier. Apple recommends adopting the reverse-domain naming convention in an attempt to make this unique. Note that the domain that you use has no tie to the DNS system or Internet domain names.
- Bundle Identifier: Even though you cannot specify the bundle identifier when creating a new Xcode project, you can change it once you’ve created your project. By default, the bundle identifier is the combination of the company identifier and the product name. Keep in mind that spaces in the product name are replaced with dashes in the bundle identifier, because the bundle identifier mustn’t contain white space.
- Class Prefix: When creating custom classes in your project, it’s important that the class names don’t collide with existing class names. By specifying a class prefix, Xcode will prefix new classes with this custom class prefix to make sure that naming collisions are averted. A common approach is to use your initials or a combination that refers to your company or organization.
- Devices: In the current version of Xcode (5.1 at the time of writing), the devices drop down menu contains three options, iPad, iPhone, and Universal. This configuration option tells Xcode which devices your project targets. By selecting the last option, Universal, your project targets both the iPad and iPhone device family. The iPod Touch is a member of the iPhone device family as you might have guessed.

In the next step, Xcode asks where you want to save your new project. You may have noticed the little checkbox at the bottom of the window labeled Create a git repository on My Mac. The gray text below the checkbox reads Xcode will place your project under version control. Choose a location for your project and click Create.
Xcode opens your new project in a window (called the workspace window), which should look similar to this:
Exploring Xcode’s User Interface
Toolbar
The toolbar at the top contains the buttons and menus that you’ll find yourself using frequently.
![]()
It displays information about your project’s state. Example, it will tell you when a build is successful or not.
The two segmented controls on the right of the toolbar can be used to customize Xcode’s user interface. Fiddle around with the various controls to find out how each of them changes Xcode’s user interface.
Navigator
The main purpose of the left sidebar is for navigation and it’s often referred to as Xcode’s navigator.

The navigator has different tabs with the Project Navigator which is at the far left. The selection in the left sidebar determines what is shown in Xcode’s main view, the workspace of the project.
Main View or Workspace
The main view or workspace is the area where you’ll spend most of your time. It’s Xcode’s workhorse and displays whatever is selected in the navigator.
Inspector
While the the left sidebar controls what’s being displayed in Xcode’s main view, the contents of the right sidebar reflects what’s being displayed or selected in the main view.
The right sidebar, also known as the inspector, adapts itself to whatever the user selects in the main view.
Enough of theory, let’s get started!
Open the Project Navigator and select the file named Main.storyboard. A file with a .storyboard extension is a user interface file. In this file, we create the user interface of the application.
The storyboard contains one item, a view controller with the white view.
The lower half of the right sidebar contains a section with four tabs. The third tab is represented by an image of a three dimensional box. This box is how objects are commonly displayed in Xcode.
Click on the tab with the box icon and scroll through the list that appears. The list is referred to as the Object Library and contains various user interface elements, such as buttons, sliders, and switches.
Let’s add a buttons to our scene
- In the Object library, find the Button object.
- Drag a Button object from the list to your scene.
Let’s add 2 buttons in our scene.

We can now double click on the button and rename it to “Fire” or in our Object inspector we can change the text value and do the same for the other button and name it was “Water”.
We now drag a “ View Controller” from the object library and place it in our storyboard. On Click of the “Fire” button we want to move to another page. So let’s connect the button to the new view controller added which is known as a segue. Segues that manages the transition between view controllers. To create a segue from the button to the next page that we want to display, we have to press the “Ctrl” and mouse click on the page(View controller).

When you mouse click, you will get a small pop-up menu shows up of the various segues that you can create. Let’s select the Push Segue which provides transition from one viewController to another.

Similarly, we add another view controller in our storyboard and create segue for to it and select Push segue as done previously.
Now, let’s go ahead and embed a navigation controller to our storyboard so that the user can move forward and backward in our app. To do this, you need to first select the root view controller( i.e the first page the user sees when app is viewed).

Then we go to Editor-> Embed In-> Navigation Controller.
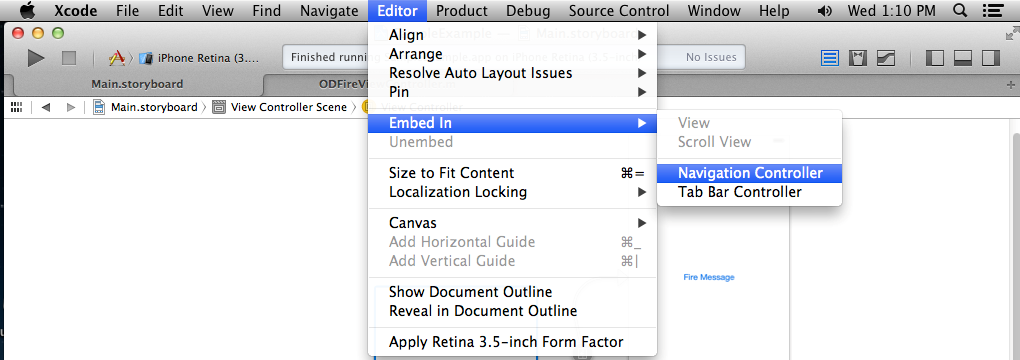
Below is the screenshot of the navigation controller that was added.
We will now create a new file so that we can add the code for the “Fire View controller”. Right click on your project and select New File.

A dialog will appear, in the iOS section at the left of the dialog, select Cocoa Touch. In the main area of the dialog, click Objective –C class and then click Next.

We then give a class name and subclass as “UIViewController”. If Checkbox “Also create XIB file” is checked then uncheck it and click on Next.

It will then ask where to save the new files created and then we click on Create. We can then see the two files that are created that is .h and .m files. Here we will be writing our code for the “Fire view Controller” logic that we will be using.  Below is a screenshot of the two files that we had just created.
Now, we need to connect our UI to our controller. In order to do that, we go to the storyboard and select the Fire View controller. Go to the right panel and select the 3rd icon. It will have a custom class property-> Class. Here we enter the name of the class we just created for “fire”. Many developers do forget to do this step which is the most important.

We will now create IBAction, so that when the user clicks on the “Fire message” button he gets an alert message.
Select the “Fire View Controller” from the storyboard and click on the bow like icon on the right top.
On doing this you will get a view of the storyboard and the implementation file viewed together as shown in the snapshot given below. We need to create an IBAction for our “Fire message” button so that when the user clicks the button he gets an alert message. We first select the “Fire message” button and then press the Ctrl and drag your mouse to the implementation file at the interface section and left-click.

When you left click on the mouse, a small popup will appear, where you will need to specify the details of the button action that we are creating. The “Connection” parameter has to be “Action”, then we can give a name for the action say “clickedFireMessage” and the Event as “Touch Up Inside” and click on connect. We have now created an event action prototype.
We’ve added an action to the view controller, but the action doesn’t do much. What we have done is declare an action.
What we need to do is implement the action and we do that in the view controller’s implementation file. That’s right. The file with the .m extension is the implementation file.
Did you expect it to be empty? Xcode has given us some boilerplate code that’s common for view controllers. The nice thing about Objective-C is that it has very readable method names. Developers often complain that the method names are long, but the advantage is that you know what a method does just by looking at its name.
We will now write some code in our event action. Before that we need to add the “UIAlertViewDelegate” protocol to your controller as shown below in order to handle the button events.

In the action event we just now declared, we will show a simple alert message. Below code displays an alert message, on click of the “Fire message” button.
Above you are creating and initializing your instance of the UIAlertView class. The initWithTitle: and message: parameters are self-explanatory and easily understood after seeing an alert displayed. The delegate: parameter refers to which class should receive delegate notification messages for the UIAlertViewDelegate . The cancelButton: parameter is the default button to be displayed along with the alert, and the otherButtonTitles: parameter is used to display one or multiple additional options that the user may select.
After creating an alert object, the [fireMessageAlertView show] call actually shows our message by popping our new UIAlertView onto the screen. Now, let’s build and run our application.


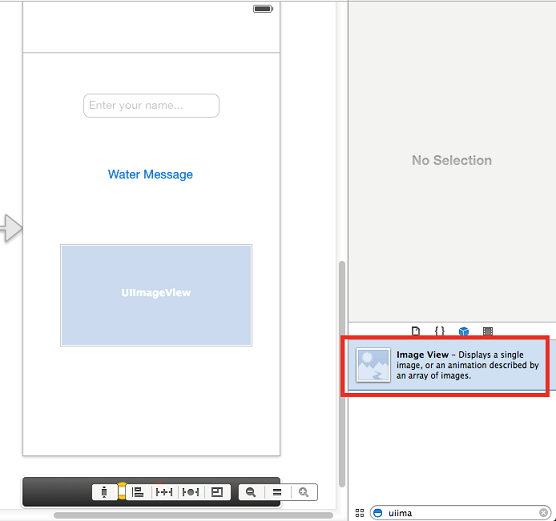
Let’s now implement the water view controller. First we drag and drop a textField from our object library and insert a place holder for it. To insert a place holder, we select the text field and on the right side property window, we have a “Place holder”.

We then drag a button and name it “water message” and drag a Image view from the object Library.
Inorder to display an image in our ImageView, we first need to add an image in our project. To do this, we right-click on our project name as shown in screenshot below and click Add Files to “Sample Example”
A file browser window will appear, allowing you to select the image files on your Mac. Select the files and click Add. A confirmation window will appear; check the checkbox for “Copy items into destination group’s folder”. Click Add again.
Once you’ve added the images to the project, you can access them either in code or in Interface Builder.
We will add our image to the imageView through the interface builder.
Select the imageView on the storyboard and in the object inspector-> Image, we select the image from the combo box, the image will automatically get shown in our storyboard.

We will now create an IBOutlet for the textField, so that we can display the name of the person in our alert message on click of the “Water message” button.
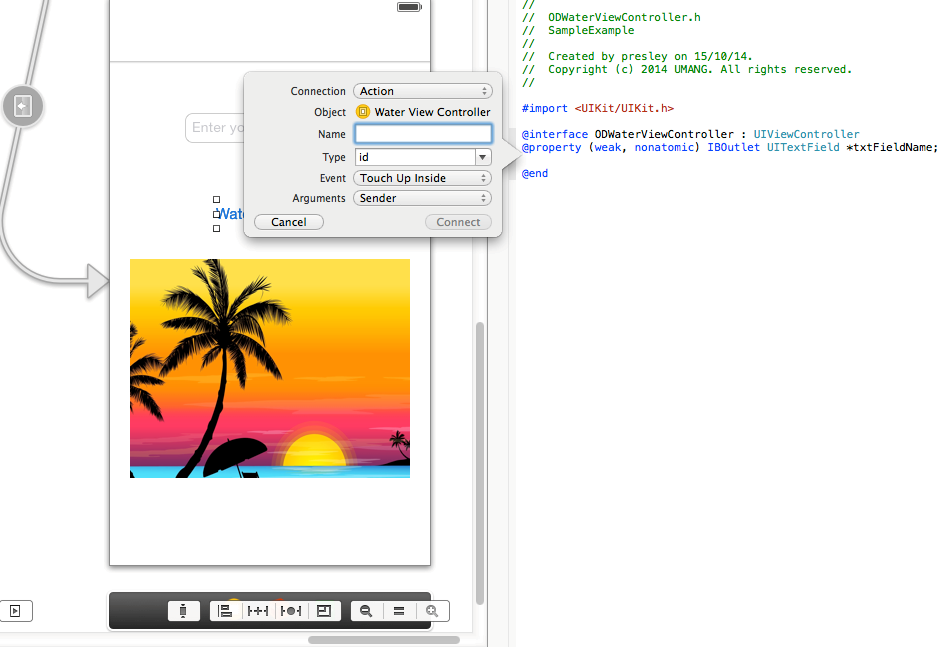
In a similar fashion how we had created IBAction previously we create IBOutlets. We select the textfield and press the Ctrl key and then drag the mouse to the .h file as shown in the below snapshot.

Then, we left click the mouse which will give us a small popup to create our IBOutlet. For connection parameter we select “Outlet” as we want to create an outlet and not an action. We then specify the name of the textField and click on Connect.
We will now create an IBAction for our “Water Message” button as done previously for “Fire Message” button.
We include 2 delegates for our water view controller implementation file.
 Below is the implementation for our action on clicking the “Water message button”.

Let’s build and run! When our app launches Click “Water” button on our first view controller and it will take us to the water view controller. Type your name in the textfield. Oh! What happened! Hitting return or touching anywhere on the screen does not dismiss the keyboard.

UIResponder is a superclass of UIView, which our text field inherits from. When an object has ‘firstresponder’ status, you can think of it as ‘having focus’ – it must respond to touches and other events. For our text field, that involved bringing up a keyboard (handled for us automatically). By resigning first responder status, we are essentially saying “we’re done, we won’t be responding to input any more” – so our keyboard goes away.
Select the file WaterViewController.m and edit it. Add the below two functions to our implementation file.


That’s it, You have successfully created your first iOS application!